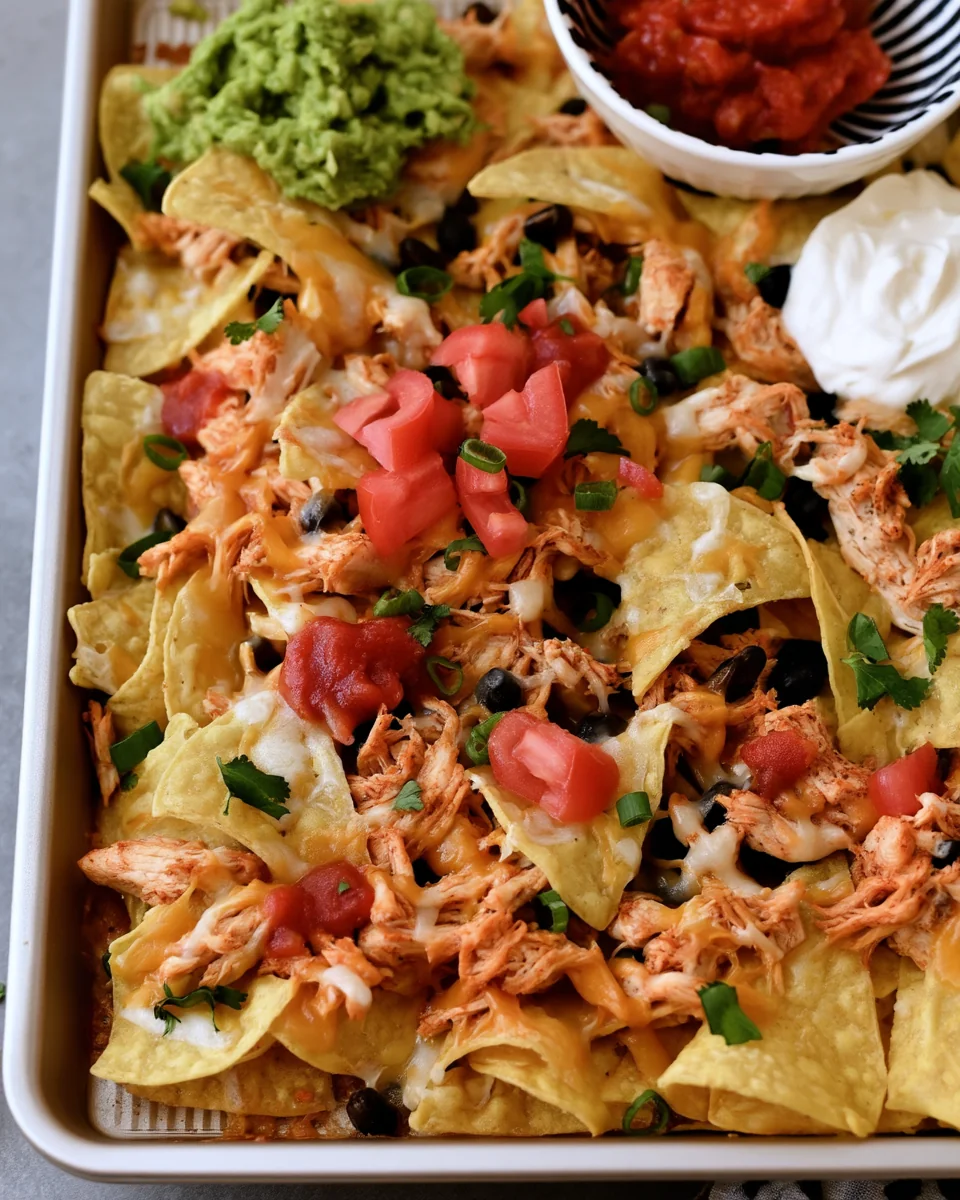
Sheet Pan Chicken Nachos are a hearty mix of crunchy tortilla chips, seasoned chicken, and melted cheese that creates a satisfying meal or snack. The layers of goodness provide bursts of flavor in every bite, making them ideal for gatherings or a cozy movie night at home. Imagine a crispy, cheesy topping complemented by fresh tomatoes and green onions; it’s the kind of dish that brings people together.
What sets this version apart is the layering technique, which includes cheese between the chips and toppings. This ensures that each chip stays crisp rather than soggy, a common issue with many nacho recipes. With just 10 minutes in the oven, you'll have delicious nachos that don’t fall flat and are ready to be served with your favorite toppings.
Why You'll Love This Recipe
- Layered Crunch — By placing cheese between layers, every chip retains its crunch, avoiding the sogginess commonly found in nachos.
- Quick Prep — In just 10 minutes, you can bake up a satisfying meal, allowing you to enjoy more time with family and friends.
- Customizable Toppings — The recipe serves as a base, meaning you can easily add your favorite ingredients to make it your own, like jalapeños or olives.
- Bulk Friendly — This recipe makes enough for six servings, perfect for sharing at parties or game days without breaking a sweat.
- Easy Cleanup — Using a single baking sheet means minimal dishes, maximizing your time enjoying the feast.
Ingredients & Substitutions
Serves 6
For the Nachos
- 1/2 batch of Slow Cooker Mexican Shredded Chicken — provides seasoned protein; you could substitute with rotisserie chicken for convenience, but it may lack depth of flavor.
- 1 large bag tortilla chips — the base for your nachos; avoid using thin chips as they won't hold toppings well.
- 3 cups shredded Colby Jack cheese — this cheese melts beautifully and adds flavor; you can swap it with Monterey Jack, but avoid cheddar as it can be too greasy.
- 1 can (15 ounces) black beans (drained and rinsed) — adds fiber and heartiness; pinto beans work as an alternative, but they will change the flavor slightly.
- 1 small Roma tomato (diced) — for freshness and color; substitute with halved cherry tomatoes if preferred.
- 2 green onions (chopped) — adds a nice crunch; chives can work too, but they have a milder flavor.
- Guacamole, salsa, and sour cream — great for topping; you can use Greek yogurt as a sour cream alternative, but it will be tangier.
How to Make Sheet Pan Chicken Nachos
Step 1: Preheat the Oven
Preheat your oven to 375°F (190°C). You want it hot enough to melt the cheese quickly without burning the chips. A properly heated oven ensures the nachos are crispy rather than soggy.
Step 2: Prepare the Baking Sheet
Spray a 10x15 inch baking sheet with nonstick spray or line it with foil for easy cleanup. This extra step helps the nachos release easily after baking and prevents any sticking.
Step 3: Layer the Chips and Cheese
Spread half of the tortilla chips evenly over the prepared baking sheet. Sprinkle 1 cup of shredded cheese over the chips. You should see some chips peeking through the cheese; this creates a solid base for the next layers.
Step 4: Heat the Black Beans
Place the black beans in a medium microwave-safe bowl. Heat for about 45 seconds until warmed. This step ensures the beans don’t cool down the nachos when baked.
Step 5: Add the First Layer of Toppings
Spread half of the warmed black beans over the chips. Follow with half of the shredded chicken, distributing it evenly to maximize flavor. Don’t rush this step; even distribution is key to every bite being flavorful.
Step 6: Repeat the Layers
Repeat the layers: add the remaining tortilla chips followed by 1 cup of cheese, then the remaining black beans and shredded chicken. Finish with the last cup of cheese on top. You should have a beautiful stacked arrangement ready for the oven.
Step 7: Bake the Nachos
Bake for 10 minutes or until the cheese is melted and bubbly, with a slight golden brown edge. You’ll know they’re done when you smell that delicious aroma and see the cheese has reached a gooey, perfect consistency.
Step 8: Top and Serve
Remove from the oven and immediately top with diced tomatoes and chopped green onions. Serve warm alongside guacamole, salsa, and sour cream. Each scoop should have a perfect balance of crunch and toppings!
How to Serve Sheet Pan Chicken Nachos
Sheet Pan Chicken Nachos are best served fresh from the oven, where the cheese is melted and the flavors meld perfectly. The ideal presentation keeps everything crisp and allows each bite to offer a satisfying crunch. This dish is versatile enough for weeknight dinners, game day snacks, or casual gatherings.
Serving Ideas
- Serve hot from the oven — This dish shines when it's fresh. Allowing it to cool for more than 5 minutes can lead to sogginess as the chips absorb moisture from the toppings.
- Use a large platter — Transferring the nachos to a wide, shallow platter helps maintain the crispness of the chips and gives guests plenty of room to dig in.
- Portion appropriately for finger food — Cut into sections, aiming for roughly 2x2 inch squares. This size lets everyone enjoy the layers without toppling toppings off.
- Pair with small bowls for toppings — Set out guacamole, salsa, and sour cream in separate bowls for easy access. This allows guests to customize their nachos without compromising the entire dish.
What to Serve Alongside
- Guacamole — The creaminess contrasts with the crispy chips, balancing textures beautifully.
- Sour Cream — Its cooling effect complements the spiced chicken and hearty flavors of the nachos.
- Pico de Gallo — The freshness and acidity of this salsa brighten the rich cheese and meats, adding a refreshing bite.
- Pickled Jalapeños — These provide a zesty, spicy kick, enhancing the overall flavor without overwhelming the dish.
- Corn Salsa — Sweet and crunchy, it adds a different textural layer and helps balance the savory elements of the nachos.
- Fresh Cilantro — A sprinkle of cilantro adds a burst of freshness that cuts through the richness of the melted cheese and chicken.
 Pin it
Tips for the Best Sheet Pan Chicken Nachos
These tips will help you avoid common pitfalls and ensure your Sheet Pan Chicken Nachos turn out perfectly every time.
- Layer ingredients properly — Start with chips, then cheese, followed by beans and chicken. This keeps the chips above the moisture and prevents sogginess.
- Avoid overloading the nachos — Limit toppings to one layer of each ingredient. A heavy top layer can weigh down the chips and make them soggy.
- Toast the chips first — Baking the chips at 375°F for 5 minutes before layering keeps them crisp beneath the toppings.
- Watch the cheese melt — Bake just until the cheese is melted and bubbly, which should be about 10 minutes. Overbaking can lead to burnt edges or dry cheese.
- Use freshly shredded cheese — Pre-shredded cheese often has anti-caking agents, preventing it from melting smoothly. Shredding it yourself leads to a better gooey texture.
- Store leftovers properly — If you have nachos left, keep them covered at room temperature for up to one day. Refrigeration makes chips stale and toppings watery.
- Slice toppings after baking — Save dicing tomatoes and onions until after baking to keep them fresh and crunchy, rather than letting them wilt under heat.
How to Store Sheet Pan Chicken Nachos
Best kept covered at room temperature for up to 1 day. Storing these nachos in the fridge can make the chips lose their crispiness, while the toppings may become watery. To keep them enjoyable, aim to eat them fresh.
Room Temperature
- Store in an airtight container for up to 1 day.
- Use a container that seals well to maintain crunch.
- Soggy chips or toppings that have lost their fresh appeal indicate it's past its best.
Refrigerator
- While it's not ideal, if you need to store them longer, keep in a covered container. They can last about 2 days in the fridge.
- The chips will soften, and the toppings may become mushy.
- Check for a watery appearance in the toppings or an overall limp texture.
Freezing Sheet Pan Chicken Nachos
- Freezing is not recommended. The texture of the chips won't hold up well after thawing.
- If you must freeze, keep only the cooked chicken separate, wrapped tightly. It can last about 2 months.
- Upon reheating, the nacho assembly will not regain its crispness.
Reheating Sheet Pan Chicken Nachos
- If you do have leftovers, you can reheat them in an oven preheated to 350°F (175°C).
- Heat for about 5-7 minutes until the cheese is melted and the nachos are heated through. Watch closely to prevent burning.
Frequently Asked Questions
Can I make Sheet Pan Chicken Nachos ahead of time?
You can prepare the shredded chicken and have all toppings ready to go in advance. Assemble the nachos just before baking for the best texture. If you assemble them early, plan to bake them within a few hours.
Why did my Sheet Pan Chicken Nachos turn out dense?
Dense nachos may result from layering too much cheese or toppings in one layer, causing moisture to build up. Ensure that cheese is distributed evenly between chips, and avoid overloading the top layer.
Can I halve the recipe for Sheet Pan Chicken Nachos?
Yes, you can easily halve the recipe. Use a 10x7.5 inch baking sheet to fit the reduced ingredients and bake for the same time, keeping an eye on the cheese to know when it’s melted and bubbly.
Does Sheet Pan Chicken Nachos freeze well?
Freezing nachos as a complete dish isn’t recommended. However, you can freeze the shredded chicken separately and assemble the nachos fresh when ready to enjoy them.
What pan can I use instead of a 10x15 inch baking sheet?
If you don't have a 10x15 inch pan, a similar sized rectangular or rimmed baking sheet will work. Just ensure the pan is large enough to hold the layers without crowding to maintain that crispy texture.
Final Thoughts
Sheet Pan Chicken Nachos are a fun and customizable dish, perfect for any gathering or a cozy night in. You can top them with your favorites, from jalapeños to fresh cilantro or even sliced olives. Try mixing in different cheeses or adding your favorite vegetables to switch things up. With a well-layered approach, every bite will delight!